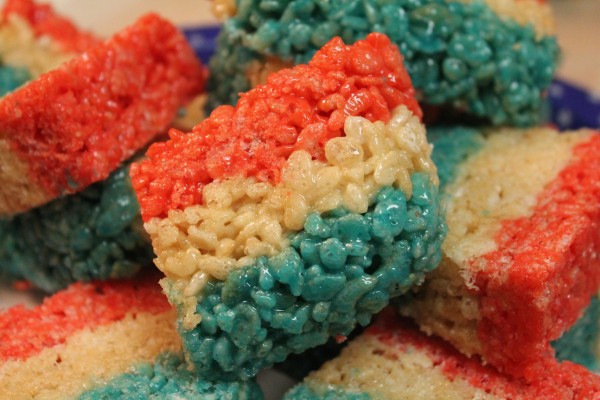
These red, white, and blue Rice Krispies treats are perfect for the 4th of July! Here’s how to make homemade Rice Krispies squares with a Patriotic twist.
- Ingredients for Homemade Rice Krispies Treats
- How to Make Red, White, and Blue Rice Krispies Treats
- How to Serve Rice Krispies Treats + Fun Rice Krispies Add-Ins
- Answering Your FAQs About Homemade Rice Krispies Treats
- More Delicious Dessert Recipes from I Heart Recipes
- Red, White, and Blue Rice Krispies Treats Video + Recipe Card
- Red, White, and Blue Rice Krispies Treats
The 4th of July is quickly approaching, and if you’re like me, you’re already planning your party menu and eventful night! My family is planning an evening of fireworks, burgers, and treats! Unlike last year, my menu will be simple because I’m actually working a 12-hour shift on the fourth (y’all, pray for meeeeeee!). I’m not grilling up any ribs, nor am I making a huge variety of desserts. I’m keeping it simple, but it will still be fabulous! One of the amazingly delicious and easy desserts on my menu will be Rice Krispies treats. Not just any Rice Krispies squares, but red, white, and blue Rice Krispies treats!
Not only are these treats totally adorable and easy to make, but they are darn right delicious. I mean, who doesn’t like Rice Krispies treats?! Growing up, everyone wanted to find one of those blue cellophane-wrapped squares in their lunchboxes, right?! Gooey marshmallows, crispy rice cereal bits, and those funny little characters make these kid-friendly favorites.
Homemade Rice Krispies treats are super easy to make. They require minimal effort, no heat (so they’re perfect for these scorching summer days, y’all!), and are REALLY budget-friendly! Seriously, you can get just about everything you need at the Dollar Tree!
Let’s dive right into showing y’all how I make my 4th of July Rice Krispies treats!
Ingredients for Homemade Rice Krispies Treats
Let’s start off with the simple ingredients you need to make these red, white, and blue Rice Krispies treats. I love this dessert because it’s affordable, sweet, and tasty.
Here’s what I used to make my 4th of July Rice Krispies treats:
- Rice Krispies cereal: I used the name-brand Rice Krispies cereal because they were on sale. You CAN also use a generic rice cereal.
- Red and Blue Food Coloring: The food coloring I used was a liquid food coloring. I bought it from Dollar Tree, and it came in a pack of four.
- Marshmallows: I used Jet-Puffed mini marshmallows from the Dollar Tree. You can absolutely use a generic brand if you want! I prefer mini marshmallows because I find they melt easier.
- Butter: Y’all definitely need to use real butter for your Rice Krispies treats, don’t bother using margarine. In my opinion, it just doesn’t taste the same!
How to Make Red, White, and Blue Rice Krispies Treats
I started with my blue Rice Krispies treats layer. Melt 2 tablespoons of butter in a pan over medium heat, then add the mini marshmallows. You want to be careful about melting the mini marshmallows, as they melt rather quickly, and you don’t want to burn them! Keep your heat at medium to medium-low. Once the butter and melted marshmallows are well-combined, add in a few drops of the blue food coloring. Mix until all the rice cereal is completely coated in the blue marshmallow mixture.
Next, grab a baking dish to create your colored Rice Krispies layers. I used a glass loaf pan and sprayed it with non-stick cooking spray. Coat your bake dish in the non-stick spray or butter so your Rice Krispies treats slide right out and don’t stick. You can also line your pan with parchment paper or plastic wrap for the same non-stick protection. Pour the blue layer of Rice Krispies into the baking dish and press everything down until the layer is even.
You’ll repeat this process for the white and red layers of your patriotic Rice Krispies treats! You obviously don’t need to use any food coloring for the white layer since the marshmallows and rice cereal are already white.
Once you’ve layered your red, white, and blue Rice Krispies treats, allow them to cool down to room temperature before cutting them. I let my Rice Krispies cool for about an hour before cutting them!
How to Serve Rice Krispies Treats + Fun Rice Krispies Add-Ins
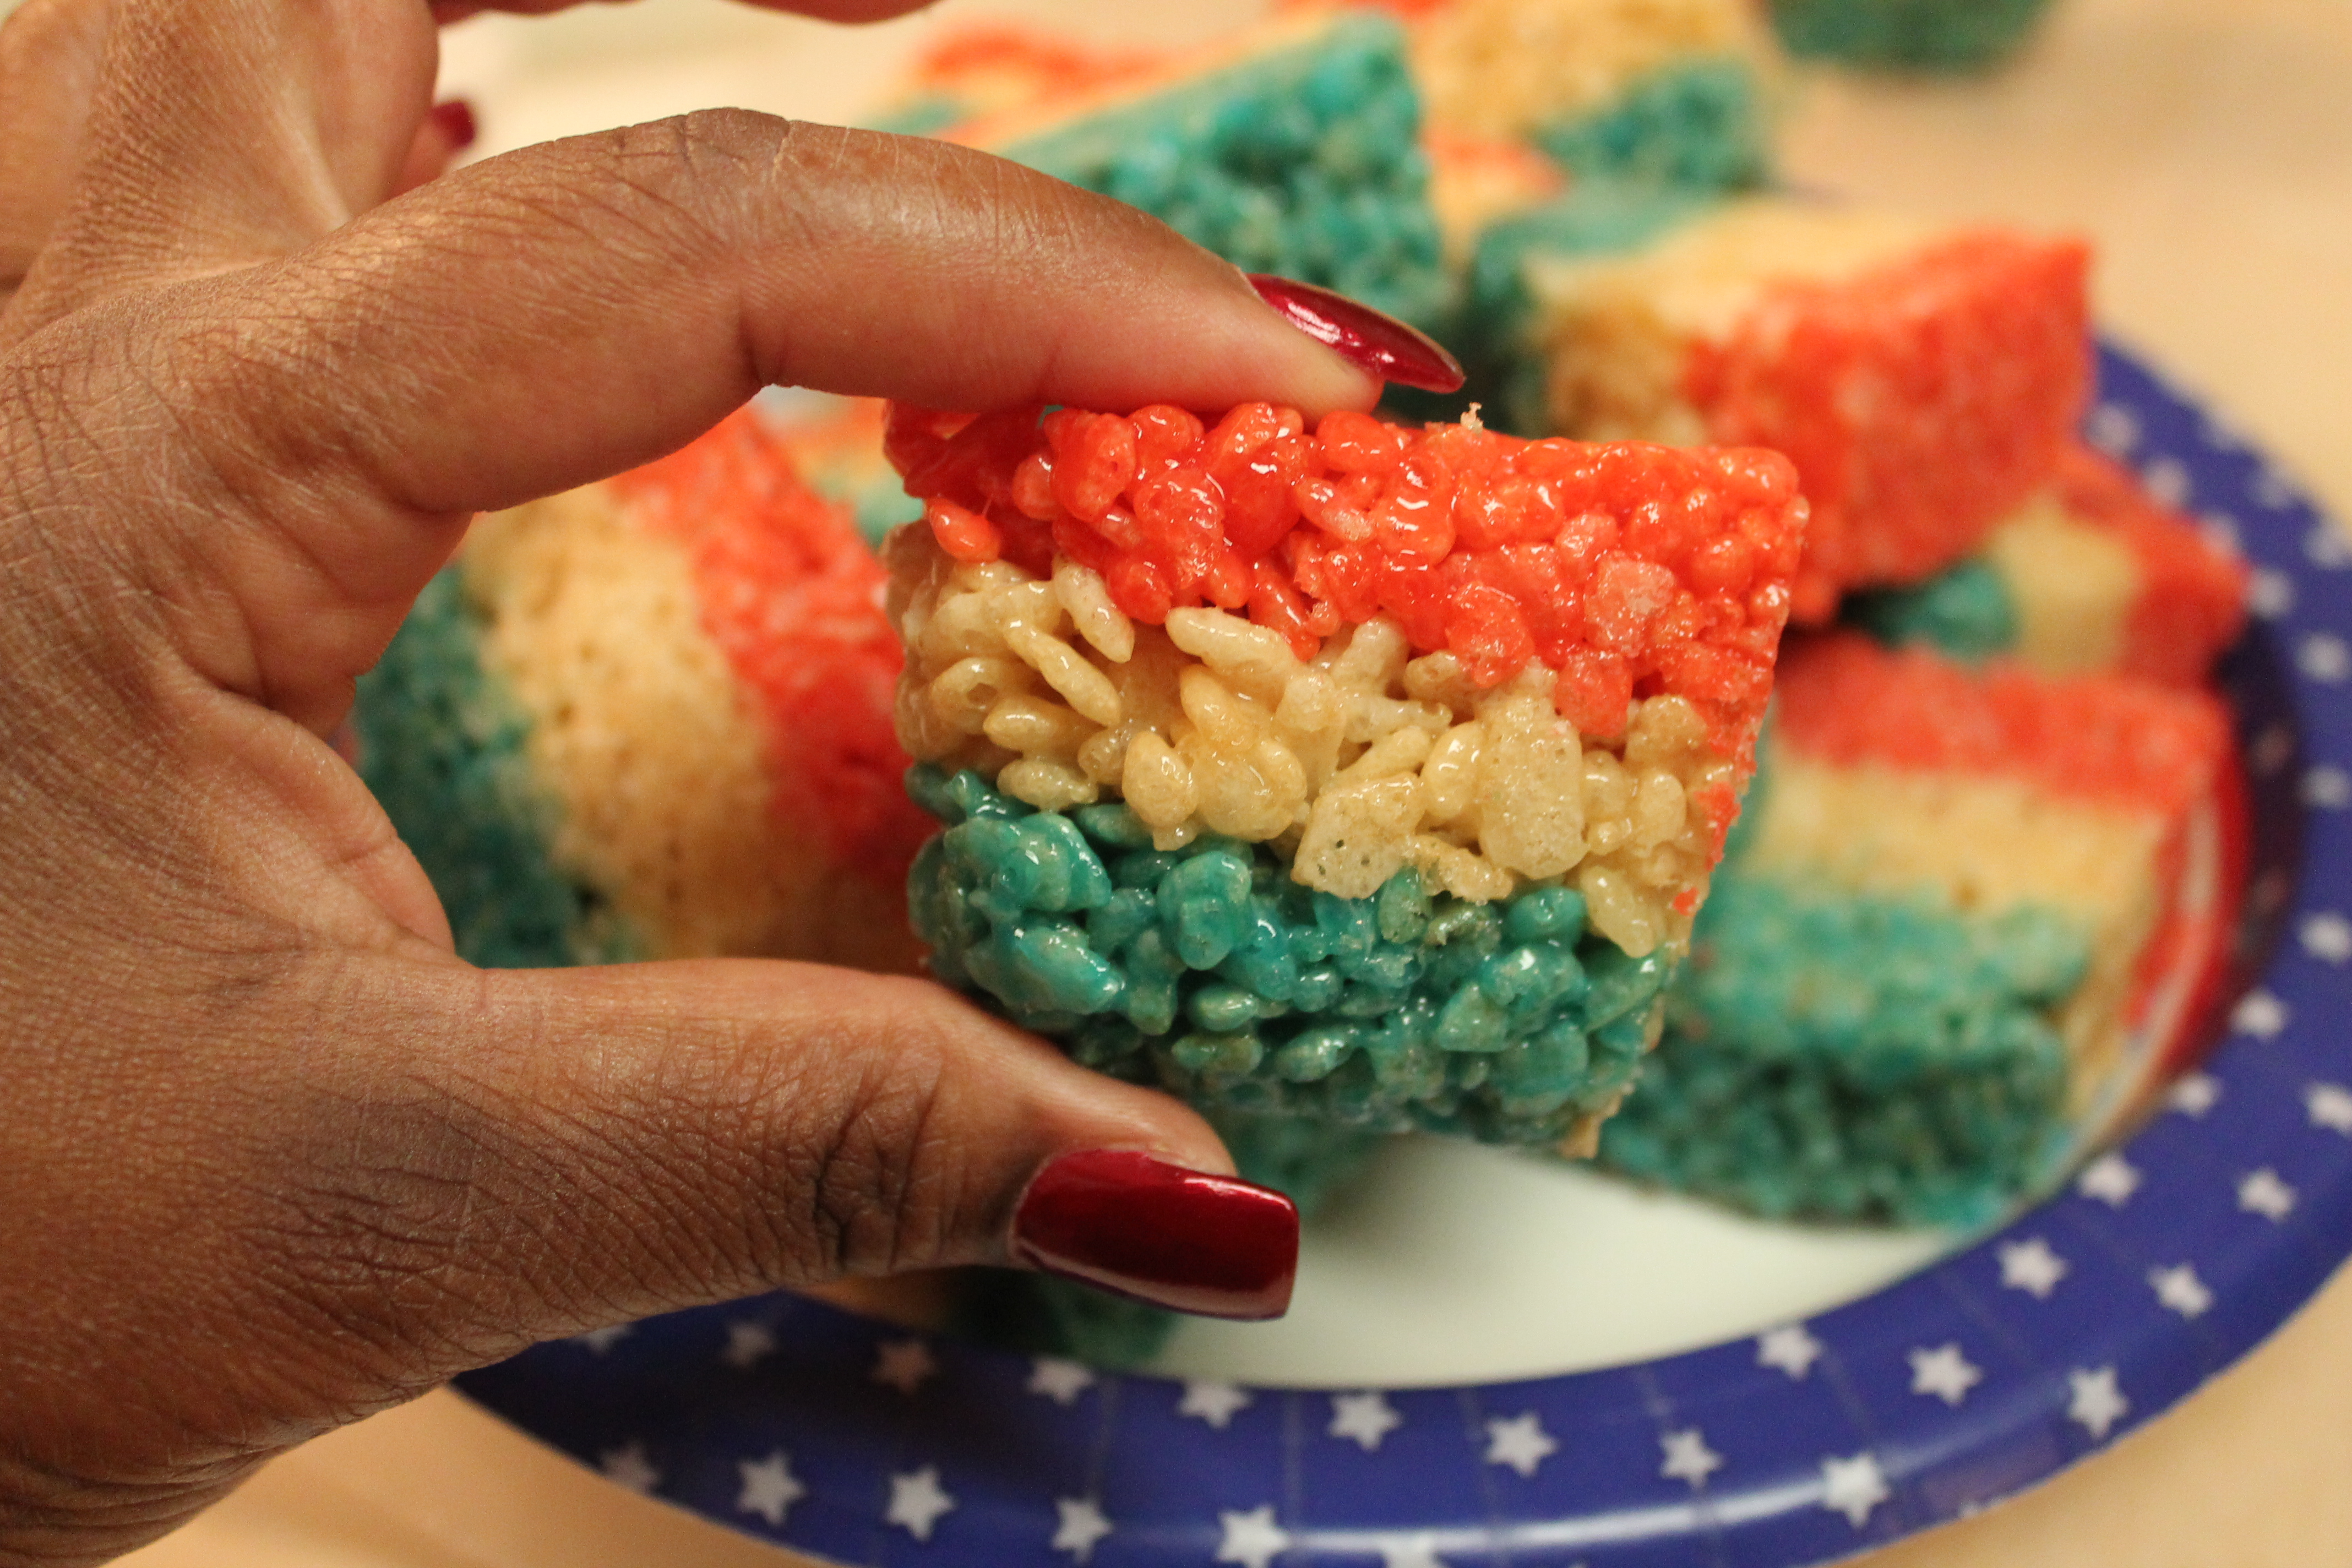
There are endless ways to serve these simple summer treats! I often cut my Rice Krispies treats into squares and bars and served them on the dessert table at my 4th of July party. They’re bite-sized and perfect for kids and adults. However, there are many other ways to serve Rice Krispies treats and make them an even tastier, patriotic dessert!
Here are some quick ideas to add some flair to your homemade Rice Krispies treats:
- Melt and dip the Rice Krispies in white chocolate or milk chocolate.
- Mix in other candies like M&Ms, chocolate chips, or sprinkles.
- Dip in melted chocolate and sprinkle colored crystal sugar, candies, sprinkles, or chocolate or caramel drizzle.
- Mix in crushed-up cookies like Oreos for festive cookies and cream Rice Krispies.
- Use Fruity Pebbles cereal, Kellogg’s® Cocoa Krispies® cereal, or even Kellogg’s® Rice Krispies® with Red and Blue Krispies if you can find them at your local grocery store.
Answering Your FAQs About Homemade Rice Krispies Treats
How to store homemade Rice Krispies treats?
When you make your own Rice Krispies treats, you want these babies to last! If you’re preparing these yummy Patriotic treats ahead of time for your Independence Day or Memorial Day parties, you should store the Rice Krispies treats at room temperature in an airtight container. They will last for up to two days. Yes, you can freeze Rice Krispies treats, but make sure the airtight container remains closed! Use pieces of wax paper in between the layers of treats if you stack them in a container.
Are Rice Krispies treats healthy?
Honey, this is a soul food blog. You know darn well we don’t concern ourselves with calories here! 😉 Rice Krispies squares are TREATS made with rice cereal, butter, and marshmallows… so no, they aren’t the healthiest thing on the planet, but we knew that, cousins! If you want the full nutrition information for traditional Rice Krispies treats, you can check out the recipe here. Just know that while these sweet treats won’t help you lose weight, they are darn tasty and should be enjoyed in moderation.
Where can I find Rice Krispies Treat cereal?
I used Kellogg’s brand Rice Krispies cereal—the OG good stuff—for my 4th of July Rice Krispies treats. You can find it at just about any grocery store! Check out the store locator on Kellogg’s website to find stores near you. If you don’t want to splurge for the name brand, generic rice cereal will do just fine.
More Delicious Dessert Recipes from I Heart Recipes
Y’all know I love my sweet treats! If you’re ready to throw the most bomb-tastic 4th of July party in your neighborhood, you need a dessert spread… Cousin Rosie has got you covered! Here are some more easy dessert recipes you’ve got to try:
- Easy Homemade Lemon Bars Recipe
- Mini Cherry Pie Bites
- Salted Caramel Pretzel Bars
- Pink Moscato Cupcakes
Red, White, and Blue Rice Krispies Treats Video + Recipe Card
Are you ready to learn how to make these festive and fun Rice Krispies treats? I’ve got a video tutorial showing you every recipe step! I promise you, this recipe takes less than 30 minutes from start to finish and is perfect for your patriotic parties. Kids and adults love this classic treat!
Print out my red, white, and blue Rice Krispies treats recipe using the recipe card below! Don’t forget to subscribe to I Heart Recipes on YouTube to see my recipe videos, cooking tips, and more! You can also follow me on Facebook, Instagram, and Pinterest to keep up with all things Rosie and I Heart Recipes!

Red, White, and Blue Rice Krispies Treats
Ingredients
- 6 tbsp butter
- 4 1/2 cup marshmallows
- 3 3/4 cup Rice Krispies
- 2-3 drops red, white, and blue food coloring
Instructions
Red Rice Krispies Layer
- Melt 2 tbsp of butter over medium-high heat, then add in the 1 1/2 cup of marshmallows.
- Once the marshmallows melt, add in a couple drops of red food coloring, then mix, until the mixture is completely red.
- Sprinkle in 1 1/4 cup of Rice Krispies, and fold in until everything is well incorporated.
- Butter a pan, and add the red layer. Be sure to spread it throughout, and pack it down to prevent any air pockets.
White Rice Krispies Layer
- Repeat the above steps, but don't add any food coloring – the white layer does not need any food coloring.
- Add the white layer on top of the red layer. Be sure to spread it throughout, and pack it down to prevent any air pockets.
Blue Rice Krispies Layer
- Repeat the above steps, adding a few drops of blue food coloring to make the blue Rice Krispies layer.
- Layer the blue on top of the white. Be sure to spread it throughout, and pack it down to prevent any air pockets.
- Let it cool down completely before cutting, and enjoy!


I would love to make these for July 4th this week. What size pan do you recommend using?? 🙂
You can use a 8X8 🙂
I love this idea and they look delicious! I am thinking of making these for Easter and hoping to create pastel colors. I don’t have much experience using food coloring. Do you have any helpful hints?
For this particular recipe you can use pretty much ant food coloring. My favorite food coloring is the gel coloring. I prefer it over the water coloring 🙂
Thank you Rosie, my children and I are traveling to Columbus to spend the 4th with my brother, and the rest of the family. The festive rice Krispy treats is a perfect traveling treat..perfect!
Thanks for coming by! XOXO
These came out great!
Rosie can I use aluminum pans with top to make rice crispy treat?I got glass Pyrex dish but iam taking to company picnic in June 2018, a 4 Th July family barbque. August church cookout at Beach. I don’t want have to look or worry about pryex dish. Do you have recipe for poke cake?
I think that would be okay. Maybe line it with some parchment paper 🙂